If you have purchased a ready-made site or created it yourself, you should upload the site content to your account to make it visible online. There are two ways to upload content to your site:
How to upload content using FTP
To upload website content from a local to a Plesk server, you need to download an FTP client program.
Follow these steps to upload your content to Plesk via FTP:
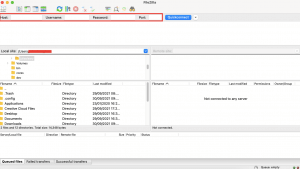
- Launch your FTP client (FileZilla, Cyberduck, WinSCP, CuteFTP, etc.). In this example, we’re using FileZilla.
- Fill in the required files.
- Host: FTP server address in the following format: ftp://your-domain-name.com (your-domain-name.com being your domain or IP address)
- Username and password: your system user login information
Note: If you’re behind a firewall, enable passive mode on your FTP client.
3. Click Quickconnect.

4. On the Remote site panel, click on your home directory.
Note: For your primary domain, the default home directory is httpsdocs. For add-on domains, please ensure that you select the directory you assigned to it. If you’re not using the default login (system user and password) and you created a separate account, you can directly upload your files to the remote site.
5. On the Local site panel, click on the folder when your website’s content is stored.
6. Select the files and directories you want to copy, then right-click and select Copy.
Your website content will be copied to the Plesk server.
How to upload content with File Manager
Follow these steps to use File Manager to upload your content:
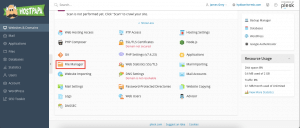
- Access your Plesk control panel through your HostPapa Dashboard.
- Go to Websites & Domains.

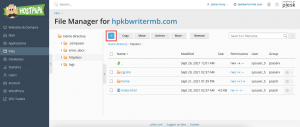
3. Click on File Manager.
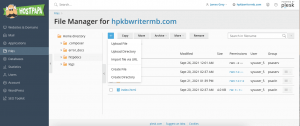
4. Click the + button.
5. To upload one file, click Upload File, then locate and select the file you want to upload.
To one or more files or a directory, click Upload Directory, then drag your files/directories to the dashed link box.
To upload a file from another website or FTP server, click Import file via URL. Specify the file URL, then click Import.
Note: File Manager can import the following file formats: HTTP, HTTPS, FTP, and FTPS.
Your files are now uploaded. If your file was an archive, complete the following steps.
- Click the row that corresponds with the archive, then click Extract Files. If there are files whose names match those in the archive, select Replace existing files. Unpacked files will replace the files in the archive.
- Click OK.
Note: File Manager can extract the following archive formats: ZIP, RAR, TAR, TGZ, and TAR.GZ.
How to edit files in File Manager
You can edit your files in File Manager using the following:
- HTML editor: a WYSIWYG editor that automatically adds necessary HMTL tags, can be used without prior HTML knowledge
- Code editor: opens HTML files as text files and highlights HTML syntax, best suited for you if you want to manually add HTML tags
- Text editor: opens HTML as plain text
Use the following steps to edit files:
- Hover over the file (this will highlight the corresponding line).
- Click to open the context menu.
- Click Edit in Editor (exact name of Editor will depend on your chosen editor).
How to search for files in File Manager
You can search for files in File Manager by searching for text in the filename only, content only, or both. To select your search method, click the dropdown arrow before searching.
If you need help with Plesk, please open a support ticket from your dashboard.
